
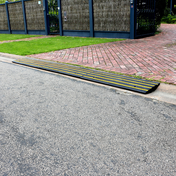
Engineered to perfection
- This ramp offers you comfort without protruding into the roadway, thus posing no obstruction or violation.
- High traction grip to avoid slips and trips when wet.
- Reflective strips illuminate your driveway at night.
Product Specifications:
- Length: 1,230mm
- Width: 410mm
- Height (in centre): 60mm
- Weight: 22kg each

Will It Fit My Kerb?
The Heeve Driveway Rubber Kerb Ramp in 1.2m Sections is suitable for most common rolled-edge kerbs.
Fits Common Rolled Edge Kerb Types:

Won't Fit On These Kerb Types:

Installation Guide For Joining Together The Heeve Rubber Driveway Kerb Ramp
Before installation make sure that the area where the ramps will be installed is free from any thrash or debris. Sweep up debris in the immediate gutter and road area and discard properly in a trash container.
Option 1. Sit Your Ramps In Place
Each ramp weighs 22kg and is heavy enough not to be blown away in the wind yet still light enough to be moved if needed. However, if you'd like a more permanent solution to keep your kerb ramps in place, see options 2 and 3 below.
Option 2. Join Your Ramps Together
Each section of the Heeve Solid 1.2m Rolled Edge Kerb Ramp can be easily joined together using the Heeve Joining Bolt & Nut for ramps which are included in the package and can also be purchased separately.
These galvanized bolts need to be driven into the adjoining section through the pre-drilled holes using simple tools.
Recommended Tools:
________________________________________________________________

_______________________________________________________________
Step 1:
First, lay all Heeve Driveway Rubber Kerb Ramp in 1.2m Sections in the gutter. Center the entire device in relation to the width of your driveway.

Step 2:
Flip each section away from the kerb, upside down into the street and parallel to the gutter. Make sure all sections are in alignment and are butted tight together end to end.

Step 3:
With safety in mind, stand on the outer receiving sections. Prepare the tools and start driving each galvanized bolts into and through the adjoining section's holes with a hammer.

Step 4:
Once alignment is properly secured and all bolts have been hammered through, get the nuts and position them screwing with your fingers. You may place a wooden block under the ramp at the location of the joint to subtly lift the joined sections and make installing the nut easier.

Step 5:
To tighten the nuts, get your ratchet and 13mm socket and start screwing the bolts through. Keep pushing both ramps in while screwing the bolts. Due to the tightness between the rubber and the bolt, the sections will stay tight to each other.

Note: Depending on the number of sections you bolted together, the Heeve Driveway Rubber Kerb Ramp now weighs approximately 66kg to 88kgs. Therefore, it is recommended that two people are available to perform the last step.
Step 6:
Starting at one end of the ramp, lift and flip the entire ramp back to its original position. Depending on the height of your kerb, push the upper edge of the ramp at the same elevation as the top of your kerb.

Now that each section is bolted together, you can have the assurance that the device will stay in place and secured from any ramp theft and only minor adjustments are required.
Over time, you may find a need to reposition the ramp right or left for easier maneuvering up and down your driveway. To reposition, just pull on one end or the other.

Download Installation Guide:
![]()
Option 3. Fix Your Ramps To The Ground
You may also opt to have the ramps bolted to the ground. Each section has 4 pre-drilled holes for permanent installation using Heeve Sleeve Anchor Bolts which are included in the package and can also be purchased separately.
________________________________________________________________
Installation Tips:
- For detailed regulations and to ensure that a kerb ramp is allowed in your area, contact your local council first before purchasing and installing any kerb ramp.
- Read this entire instruction guide to make assembly very easy.
- Over time, the ramps may move from side to side. This is normally due to debris under the ramp or from continuously entering the driveway at an angle, pushing the ramp to the side. It’s advisable to regularly clean the debris underneath and enter the driveway with both front tyres touching the ramp at the same time.
- If you have to move the ramps from side to side, it is easier to lift up the ramp at midpoint of the run and lean back, pulling the ramps the way you want them to move.
- To protect the ramp system from being pushed by your trash removal folks, position your garbage in the direction opposite of your ramps, as close to the kerb as possible to force the trucks out into the street and away from your ramp.

5 comments
Hi Steve! It would depend on the actual kerb. One of the main reasons why we request for photos of your driveway is to better access the kerb and see all possible options for you.
It’s refreshing to see such an informative piece that breaks down the complexities surrounding installation regulations, especially for those looking to enhance accessibility at home. The emphasis on compliance with local council guidelines is crucial, as it ensures safety and avoids potential fines.
What can you recommend for the herb types you’ve described as unsuitable for the Heeve?
Hi Steve,
We don’t install however, a local builder can help you with installation. It is also recommended to seek council approval before installing anything permanently on public roads.
Do you install these ramps, and if not can you recommend someone.
Thanks
Steve