
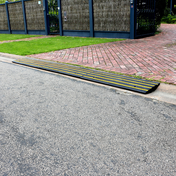
If you’re tired of your vehicle scraping the kerb or struggling with uneven driveway access, the Heeve® Driveway Rubber Kerb Ramp in 1.2m modular sections offers the perfect solution.
Engineered specifically for Australia’s rolled-edge kerbs, this durable ramp provides a smooth, safe transition from street to driveway, combining functional performance with a clean, professional look.
Engineered for Excellence
-
Precision-Engineered Fit: Designed to suit the standard rolled-edge kerb profile commonly found in Australian suburbs, no trimming required.
-
Premium Materials: Made from commercial-grade solid rubber, built to handle daily vehicle, trailer, and 4×4 use in all weather conditions.
-
Low-Profile & Safe: At just 60mm high, the ramp sits flush with the kerb for smooth entry while keeping footpaths accessible.
-
High Traction & Visibility: Non-slip surface texture and reflective yellow strips ensure safe use day and night.
- Smart Drainage Design: Built-in water channels allow rain to flow freely, preventing pooling and keeping gutters clear.
- Modular & Scalable: Available in 1.2 m sections, giving you flexibility to match your driveway width and easily expand or adjust as needed.
Product Specifications
- Length: 1,230mm
- Width: 410mm
- Height (centre): 60mm
- Weight per section: 22kg
- Load Capacity: Up to 10,000kg (each section)
- Colour: Black with high-visibility yellow strips


Will It Fit My Kerb?
The Heeve® Driveway Rubber Kerb Ramp in 1.2m Sections is designed for most rolled-edge kerbs. Before installing, check your kerb profile to ensure the perfect fit.
Fits Common Rolled Edge Kerb Types:

Does Not Fit Standard Kerb Types:

Installation Guide for Joining Heeve® Driveway Rubber Kerb Ramps
Before You Begin
Ensure the installation area is clean and free from debris. Sweep the gutter, kerb, and road surface to provide a stable base and prevent movement once installed.
Option 1: Position the Ramps
Each 22 kg Heeve® Ramp is heavy enough to stay securely in place yet light enough to move when needed. Simply position each section where desired. For a more permanent setup, continue with options 2 and 3.
Option 2: Join Multiple Sections
Each Heeve® Solid 1.2m Rolled Edge Kerb Ramp includes galvanised bolts and nuts for joining. These lock sections together through pre-drilled holes, creating a smooth, continuous surface.
Tools Required:
- Hammer or mallet
- Pliers
- 13 mm socket and ratchet

Step 1. Position the Ramps
Lay all sections in the gutter, centred across your driveway.

Step 2. Flip and Align
Turn the ramps upside down so the undersides face up. Align sections tightly end-to-end.

Step 3. Insert Bolts
Tap bolts through the joining holes using a hammer.

Step 4. Fit Nuts
Hand-tighten each nut. Use a wooden block underneath if extra clearance is needed.

Step 5. Tighten Securely
With a 13 mm socket, tighten until the sections pull snugly together.
(Note: Joined ramps may weigh 66–88 kg. Two people are recommended for handling.)

Step 6. Flip and Position
Turn the ramp upright, aligning the top edge with the kerb. Adjust as needed until even.

Now that each section is bolted together, you can have the assurance that the device will stay in place and secured from any ramp theft and only minor adjustments are required. Over time, you may find a need to reposition the ramp right or left for easier maneuvering up and down your driveway. To reposition, just pull on one end or the other.
Option 3: Fix Your Ramps to the Ground (Permanent Installation)
For maximum security and to prevent theft, you can bolt your ramps directly to the ground using the four pre-drilled holes on each section. Use Heeve® Sleeve Anchor Bolts for Ramps, included with your ramp or available separately if needed.
Note: Local regulations for kerb ramps can vary. Check the Australian Government’s Local Council Directory to find your council and confirm installation requirements in your area.

Download Installation Guide:
![]()
Post-Installation Care & Usage Tips
Once installed, your Heeve® Driveway Rubber Kerb Ramp requires minimal maintenance to keep it performing at its best. Follow these simple tips for long-lasting performance.
- Keep It Clean: Sweep away leaves, gravel, or debris regularly.
- Check Alignment: Lift and reposition if the ramp shifts over time.
- Enter Straight On: Drive directly over the ramp to avoid lateral movement.
- Avoid Obstructions: Keep bins or heavy objects away from the ramp.
- Inspect Fixings: Periodically check anchor bolts to ensure they remain tight.
These simple steps will help your Heeve® ramp secure and perform at its best for years to come.
Frequently Asked Questions
Q: Do I need council approval to install the Heeve® driveway kerb ramp?
A: Council approval may be required depending on your area. Check with your local council before installation, or see our Kerb Ramp Regulations Guide for more details.
Q: How do I secure my kerb ramp?
A: Each Heeve® Driveway Kerb Ramp includes Sleeve Anchor Bolts that can be used to join sections or fix the ramp to the ground, keeping it stable and secure.
Q: How many ramps do I need for my driveway?
A: Each Heeve® ramp section is 1.2 m long. Measure your driveway width and combine sections for full coverage. For curved driveways, see the Heeve® Kerb Ramp Bend.

7 comments
Hi Domenic,
Please email us at hello@rampchamp.com.au or call us at 1300 913 047 so we can help you with a quote for the rubber kerb ramps you need.
After a quote
Hi Steve! It would depend on the actual kerb. One of the main reasons why we request for photos of your driveway is to better access the kerb and see all possible options for you.
It’s refreshing to see such an informative piece that breaks down the complexities surrounding installation regulations, especially for those looking to enhance accessibility at home. The emphasis on compliance with local council guidelines is crucial, as it ensures safety and avoids potential fines.
What can you recommend for the herb types you’ve described as unsuitable for the Heeve?
Hi Steve,
We don’t install however, a local builder can help you with installation. It is also recommended to seek council approval before installing anything permanently on public roads.
Do you install these ramps, and if not can you recommend someone.
Thanks
Steve